How to Tune a 2000W E-Bike Controller: DC Current, Acceleration Strength and Ride Profiles
AK
Andy Kirby
Reviewed by the KirbEbike conversion-support team
Share
Unlock £10 off today
On this page
Tuning a high-power controller is not about finding the maximum. It is about deciding how much current the system can safely supply, then shaping how quickly that current arrives.
The Quick Answer
Two settings do most of the work. DC current sets the electrical ceiling — how much the controller may draw from the battery, and therefore the torque available. Acceleration strength sets how quickly the controller ramps toward that ceiling, which is what you actually feel. Set the ceiling first from your components, then shape the ramp. That ceiling is not the controller’s maximum — it is the lowest of three limits: what the battery can continuously supply, what the controller is rated for, and what the motor can shed as heat. A 2000W system is outside EAPC classification in Great Britain, so this is private-land tuning.
Capability is set by components, not by the app. Tuning decides how much of what the hardware can safely give you actually reaches the ground.
Direct Answer: Which Setting Does What?
Setting
What it controls
Change it when
Main risk if overdone
DC current limit
Electrical ceiling and available torque
Torque is short or you need to protect parts
Battery cut-out, heat, component stress
Acceleration strength
How fast power ramps to that ceiling
Delivery feels harsh or too soft
Wheelspin, harsh starts, drivetrain shock
PAS level mapping
What each assist level delivers
Levels are bunched or unusable
Ghost pedalling, wasted battery
Throttle response
How the throttle feels
Starts are hard to control
Loss of traction at low speed
Two settings dominate; the rest refine what they establish.
Set DC current from what your components can safely take, then tune acceleration strength for feel. Doing it the other way round means tuning feel against a ceiling that may be unsafe.
Before You Tune: Know the Three Limits
Tune to the lowest limit, not the highest
An illustrative example using the 35A FOC controller published for our own 2000W kit alongside a 60A-rated pack. Teal marks the binding constraint. Your usable ceiling is the lowest bar, not the highest — and on sustained climbs the motor’s ability to shed heat is often what binds. Use your own component figures.
Battery continuous / BMS 52V pack, 60A rating
60 A
Controller maximum 35A FOC unit
35 A
Motor thermal comfort sustained climbing
25 A
The whole safety principle in one line
Usable ceiling = lowest of (battery, controller, motor thermal) − headroom
In the example above that is 25A, not 60A. The largest number in your build is never the setting.
Each limit fails differently, which is why you need all three rather than the one that is easiest to look up.
Limit
What sets it
How it announces itself
When you notice
Battery
Continuous discharge capability and BMS current — not capacity, not the peak figure
Voltage sags under load, then protection cuts power
Immediately, on hard acceleration
Controller
The unit’s rated maximum current and voltage range
Rarely warns — it fails
Once, permanently
Motor thermal
How fast the motor sheds the heat the current creates
Power fades, case gets hot, output rolls back
After minutes of sustained load, not seconds
The motor limit is the one people miss, because it is invisible in the first minute of riding.
A large pack with a modest BMS still cuts out on climbs, which is why capacity is the wrong number to read. The controller limit is its rated maximum, and exceeding it is how controllers fail. The motor limit is thermal: it will accept more current than it can shed heat from, which is why problems appear on long climbs rather than in the first minute.
Installation sound — axle hardware, torque arm, brakes and wiring all correct before any tuning
Battery figures known — continuous discharge and BMS current, not capacity or peak
Controller rating known — the maximum current and voltage range printed on the unit or its datasheet
Connector and cable rating — wiring sized for the current you intend to allow
Original settings saved — photograph or export the factory configuration first
Somewhere legal and safe — private land with permission, and space to test at low speed
DC Current vs Acceleration Strength
These are frequently confused, and the distinction is the most useful thing in this article. DC current is the battery-side current limit: it caps how much energy per second the controller may draw, which sets the maximum torque the motor can produce and therefore the system’s real capability. Acceleration strength does not change that ceiling at all — it changes the rate at which the controller ramps current toward it.
High ceiling, gentle ramp
Feels smooth and unhurried off the line
Still climbs hard once loaded up
Kind to tyres, chain and dropouts
The setup most riders end up preferring
Modest ceiling, aggressive ramp
Feels sharp for the first few metres
Runs out of pull sooner on a real climb
Spins the rear tyre on loose or wet ground
Flatters a test ride, disappoints on a hill
Riders who describe a bike as “fast but gutless” usually have the second arrangement. The sensation of speed comes from the ramp; the ability to hold speed up a gradient comes from the ceiling. They are separate settings and they should be judged separately.
How to Tune DC Current Without Guessing
Work from your components. Find the battery’s continuous discharge and BMS current, find the controller’s rated maximum, take the lower of the two, then subtract headroom rather than sitting at the limit — running continuously at a component’s maximum is how it becomes its former maximum.
Then adjust in small steps. Change the setting by a modest increment, ride a repeatable test — same hill, same speed, same load — and check three things: whether the battery held voltage without cutting out, how hot the motor and controller are after a few minutes of load, and whether behaviour stayed consistent. If voltage sagged heavily or anything ran unusually hot, you have found your ceiling.
🔥
Raising current costs more heat than it looks. Resistive losses rise with the square of current, so going from 20A to 30A does not add 50% more resistive heating — it roughly doubles it. That is why a modest current increase can turn a system that was thermally fine into one that fades on every long climb, and why headroom matters more than headline numbers.
Why the heat curve bites: resistive loss against current
Relative resistive heating at each current, taking 20A as the baseline. Loss rises with the square of current, so the penalty accelerates as you raise the limit. Teal = the conservative end; blue = where thermal problems start appearing on sustained climbs.
20 A baseline
1.0×
25 A
1.6×
30 A
2.3×
35 A
3.1×
40 A
4.0×
Arithmetic from I²R with resistance held constant, not a measured temperature rise. Real motor temperature also depends on airflow, duty cycle, ambient conditions and how long you hold the load — but the shape of the curve is why 40A is a very different proposition from 20A, not merely twice as much.
How to Tune Acceleration Strength
Surface decides how much ramp you can use. A setting that feels controlled on dry tarmac will spin the rear tyre on wet grass — which is why traction, not the number in the app, is the real limit.
Once the ceiling is set, acceleration strength decides the character of the bike. A softer ramp gives predictable starts, better traction on loose or wet ground, less shock through the drivetrain and a calmer feel in traffic. A sharper ramp gives immediate response off the line, which suits open private-land riding where traction is good and you want the power now.
On a 2000W system, restraint here does more for control than anything else, because the motor has more torque available than the tyre can always use. Start softer than you think you want, then sharpen gradually.
💡
Three signs the ramp is too aggressive for the surface, whatever the number says: the front wheel lifts when you open the throttle, the rear breaks traction on a normal start, or the bike lurches at walking pace when you are trying to place it precisely. Any of those means back it off — the setting is writing cheques the tyre cannot cash.
Change one thing at a time. If you raise DC current and sharpen acceleration in the same session, you will not know which caused a problem, and on a high-power system the problem may be a component rather than a feeling.
Build Three Ride Profiles Instead of One Maximum Tune
Profile
DC current
Acceleration
Suits
Efficient
Well below the ceiling
Soft
Longer rides, preserving range and parts
Balanced
Moderate
Moderate
General riding, mixed terrain
Performance
At your safe ceiling
Sharper
Short private-land sessions with good traction
Three saved configurations are more useful than one maximum setting.
This is where a programmable controller earns its cost. Most riders who chase a single maximum tune end up with a bike that is unpleasant in three out of four situations and marginally quicker in the fourth. Saving profiles — and exporting them, if the app allows — means you can move between them without re-tuning from memory, and you always have a known-good configuration to return to. Our controller and display range covers which units support saved configurations.
PAS Levels, Throttle Response and Ghost Pedalling
PAS mapping decides what each assist level delivers. Factory maps often bunch the useful range into the top two levels, leaving level 1 too strong for filtering and levels 2 to 4 barely distinguishable. Spreading them evenly gives steps you will actually use, and a gentle level 1 makes slow manoeuvring on a heavy bike far easier.
A bunched factory map
Level 1 already too strong to filter through traffic
Levels 2 to 4 feel nearly identical
Level 5 is the only one that does anything distinct
You end up using two of five settings
A map worth having
Level 1 gentle enough for walking pace and tight turns
Even steps you can feel between each level
Top level at your safe ceiling, not beyond it
Every setting earns its place on the display
Ghost pedalling is the disconnected sensation when the motor supplies far more than your pedalling warrants, so the pedals spin without contributing. It is common on high-power systems with aggressive low-level assist. The fix is tuning rather than hardware: lower the assist at PAS 1 and 2, soften the ramp, and the pedals start to feel connected again.
Throttle response is a separate curve from PAS on most controllers. A softer curve gives controlled starts on a heavy bike; a sharper one suits good surfaces. On a 2000W build, tune it softer than feels necessary and firm it up only after riding.
Using Live Data While Tuning
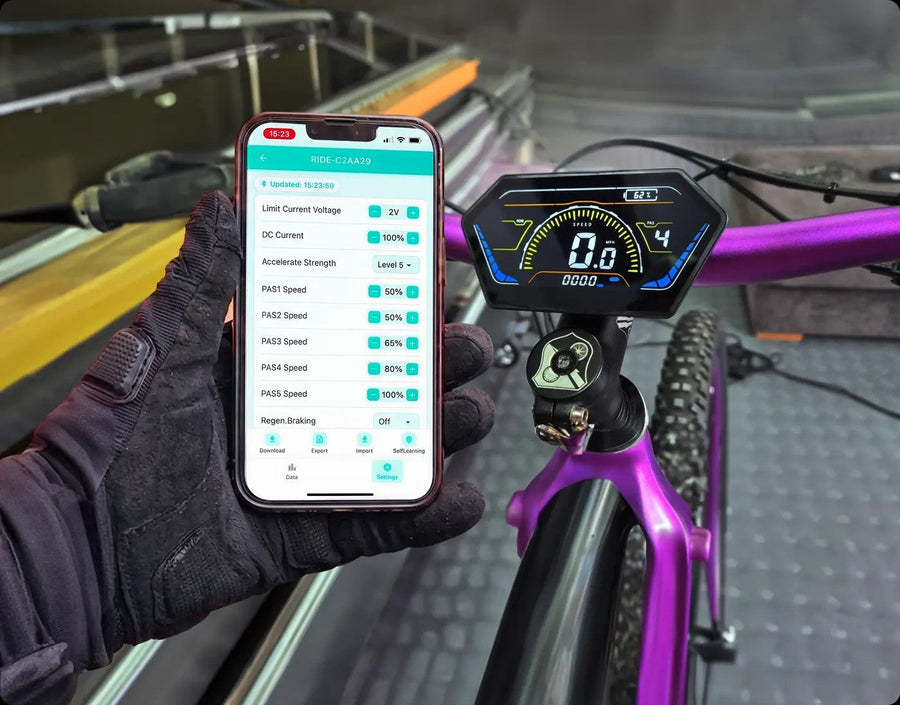
Numbers beat impressions. Battery percentage, live power draw and assist level on one screen — enough to tell a controller limit from a battery limit without guessing.
Guessing is what makes tuning dangerous; measurement is what makes it useful. If your system reports live data, watch battery voltage under load, current draw, and controller and motor temperature where available. Voltage that dips sharply when you open the throttle indicates the pack is struggling to supply what you are asking for, which is a battery limit rather than a controller one.
Temperature is the other signal worth watching. Heat accumulates over minutes, so a setting that feels fine on a short blast can be unsustainable on a ten-minute climb. Take readings after sustained load rather than at the end of a fast run, and treat rising temperature with a stable setting as a sign you are at the edge.
What you see
What it usually means
What to change
Voltage dips hard the moment you accelerate, recovers when you ease off
Battery cannot supply the demand — a pack limit, not a controller one
Lower DC current, or fit a pack with a higher continuous rating
Power is capped but completely consistent
The controller is limiting as configured
Nothing is wrong; raise the limit only if the other two limits allow
Fine for two minutes, fades on a long climb
Motor thermal limit — the classic high-power symptom
Lower the ceiling, gear down to raise wheel speed, allow recovery between climbs
Sag worsens as the pack empties
Normal cell behaviour at low state of charge
Tune to be stable at low charge, not just on a full pack
Controller hot, motor cool
Often wiring or connector resistance rather than the setting
Check cable gauge and connectors before touching the tune
Diagnose which limit you have hit before changing anything. Raising a setting against the wrong limit makes the problem worse, not better.
Voltage Sag, Heat and Why Bigger Is Not Automatically Better
Voltage sag and the current limit look similar from the saddle but are different constraints. If the controller is limiting, behaviour is consistent and repeatable. If the battery is sagging, voltage drops under load, power fades unevenly, and it worsens as the pack empties. Raising the current limit against a sagging battery makes matters worse.
Which is also why fitting a 3000W controller to a 2000W system rarely helps. A larger controller does not add battery capability, motor thermal capacity, brake performance or frame strength, and it can let the system draw current the rest of the build cannot support. Efficiency is genuinely mixed at these levels too — published motor-control engineering analysis in EDN notes that a motor usually runs more efficiently under field-oriented control while the inverter can run more efficiently under simpler commutation at full speed, so which arrangement wins depends on your specific motor and controller. Upgrade the binding constraint, not the biggest number.
What a bigger controller does and does not buy
More headroom ≠ more battery + more cooling + more brake
If the binding limit was the pack or the motor’s heat path, a larger controller changes nothing except how quickly you reach the real limit.
Tuning Does Not Change the Legal Position
A 2000W system is outside Electrically Assisted Pedal Cycle classification in Great Britain. An EAPC requires working pedals, a motor rated no higher than 250W continuous, and assistance that stops at 15.5mph, with the rider aged 14 or over (GOV.UK electric bike rules). A cycle exceeding that is treated as a motor vehicle in law, bringing type approval, registration, insurance, licensing and helmet requirements, as the EAPC information sheet sets out.
⚖️
Software settings do not re-classify a motor. Selecting a lower current limit or a restricted mode does not change a motor’s documented continuous rated power, and it is that rating which determines classification. A 2000W kit stays outside EAPC classification whatever the app is set to. It may be used on private land only with the landowner’s permission and subject to site rules, or on public roads only if the relevant motor-vehicle approval, registration, tax, insurance, licence and equipment requirements are met. This guide gives no method for bypassing road-legal limits.
If road-legal use is what you need, the answer is a different motor rather than a different setting — our 250W road-legal range is the compliant route, and the EZ Rider is the lowest-effort example of it.
A Safe Tuning Workflow
Check the build first — axle hardware, torque arm, brakes, tyres and wiring, before any setting changes
Record the original configuration by export or photograph
Establish the ceiling from battery, controller and motor limits, taking the lowest and leaving headroom
Set DC current to that figure and ride a repeatable test
Check voltage, temperature and consistency after sustained load, not after a short blast
Then tune acceleration strength for feel, one step at a time
Save the profile, then build the other two around it
Stop immediately if you find heat, a burning smell or melted insulation, and investigate before riding again
Programmable Controllers Compared
Four routes, listed alphabetically and judged on the same criteria: control method, configuration route, power class and the main limitation. Confirm current specifications on each supplier’s page before buying, because support varies by model and firmware.
Fardriver ND Series
Programmable FOC controllers aimed at the higher-power end, with models covering the 2000W to 3000W class and above. Configuration is through a visual computer interface with online firmware updating, and the design uses Hall-based current sensing for accuracy. The appeal is depth of parameter control for builders who want it. The limitations are that these are aimed at scooter and light electric-motorcycle applications as much as bicycles, documentation is technical rather than consumer-facing, and setup expects a PC rather than a phone.
KirbEbike Smart FOC Controller
Bluetooth-configurable FOC controllers with DC current, acceleration strength, PAS mapping, throttle response, regen settings, live monitoring and profile export, offered in ratings matched to different systems. The 52V 2000W MTX kit pairs a 2000W direct-drive hub with a published 35A FOC controller, which is the worked example above. Honest limits: they pair with our own compatible motors and displays rather than universally, the units are potted so a fault means replacement, and 2000W sits outside EAPC classification.
Sabvoton Programmable Controllers
Established programmable FOC sine-wave controllers spanning roughly 36V to 72V and 45A upward, covering the 1000W to 8000W range depending on model. They offer app or PC parameter setting via a Bluetooth module, self-learning motor matching that identifies the electronic angle in a few minutes, regenerative braking and flux weakening, with IP65-rated cases. The limitations are that the ecosystem is oriented toward high-power scooter and motorcycle builds, listings vary in accuracy between resellers, and support depends heavily on where you buy.
VESC-Based Controllers
An open-source FOC platform with unusually deep configuration, covering motor detection, current limits both battery-side and phase-side, ramping profiles and data logging. Hardware from several manufacturers runs the same firmware and the community documentation is extensive, which suits builders who want to understand every parameter. It is the least beginner-friendly option here: it needs a computer, careful motor detection before first use, and real understanding of the settings, and board quality varies between vendors so buy on the specific hardware.
Option
Control
Configuration
Power class
Main limitation
Fardriver ND
FOC
PC interface
2000W upward
Technical, PC-based setup
KirbEbike Smart FOC
FOC
Bluetooth app
250W–2000W+
Own-brand pairing; potted
Sabvoton
FOC sine wave
App or PC via Bluetooth
1000W–8000W
Reseller variability
VESC-based
FOC
PC tool, open source
Wide
Steep learning curve
Listed alphabetically. Verify the specification rather than the listing title. Published specifications, checked 17 August 2026.
Common Tuning Mistakes
Mistake
Why it costs you
Setting DC current to the controller maximum
The ceiling is the lowest of three limits, not the highest
Tuning before fixing the installation
Aggressive settings magnify loose hardware and worn brakes
Changing current and acceleration together
You cannot attribute the result to either
Ignoring voltage sag
Raising current against a sagging pack makes it worse
Judging a setting on a short blast
Thermal limits take minutes to appear, not seconds
Fitting a bigger controller to fix a limit
It does not add battery, motor, brake or frame capability
Assuming a lower setting makes it road-legal
Continuous rated power determines classification
Product touchpoint
Tuning within what the system can supply
Tuning only works when the components agree with each other. Establish what your pack can continuously supply, check it against the controller rating, then set your ceiling below the lower of the two. Our 52V 2000W MTX kit is supplied as a matched motor, controller and battery combination for exactly that reason. If your pack cannot supply what you want to configure, the answer is a better-matched battery, not a higher setting.
Conclusion: Set the Ceiling, Then Shape the Delivery
DC current establishes what the system can do; acceleration strength decides how it feels doing it. Set the ceiling from your components — the lowest of battery continuous supply, controller rating and motor thermal capacity, with headroom — then tune the ramp for the surface and the riding. Change one thing at a time, judge it after sustained load rather than a short burst, and save what works.
Three profiles beat one maximum tune, live data beats guessing, and a well-matched system beats a bigger number every time. Keep the legal position clear as well: a 2000W build is outside EAPC classification in Great Britain regardless of settings, so it belongs on private land with permission. Use only a charger authorised for your pack, and stop immediately if you find unusual heat, a burning smell or damaged insulation.
Tune to the lowest limit, not the highest
Battery, controller and motor each set a ceiling. The safe one is whichever comes first.
It caps how much current the controller may draw from the battery, which sets the maximum torque available. It establishes the system’s ceiling rather than how quickly power arrives — that second job belongs to acceleration strength.
What is acceleration strength on an e-bike controller?
It sets how quickly the controller ramps current toward the DC current limit. It changes how the bike feels off the line without changing how much power is ultimately available, which is why a bike can feel sharp and still run out of pull on a climb.
Which should I change first, DC current or acceleration strength?
DC current, because it defines the safe ceiling from your battery, controller and motor limits. Tune acceleration strength afterwards to shape how that ceiling is approached. Doing it the other way round means tuning feel against a ceiling that may be unsafe.
How do I know what DC current to set?
Take the lower of your battery’s continuous discharge and BMS rating and the controller’s rated maximum, then leave headroom below it. Sustained motor heat on climbs may bring the practical figure lower still, so verify with a repeatable test on a real hill rather than a short blast.
Can tuning make a 2000W e-bike faster?
Only within what voltage, motor winding, wheel size and load already allow. Tuning shapes delivery and can recover performance lost to a conservative factory setting; it does not add capability the hardware lacks.
Why does my e-bike cut out when I accelerate hard?
Usually the battery cannot supply the current being demanded, so voltage sags and protection intervenes. Check continuous discharge and BMS ratings before raising any limit — raising the current limit against a sagging pack makes the cut-outs more frequent, not fewer.
Is a 3000W controller better than a 2000W one?
Not on a 2000W system. A larger controller adds no battery capability, motor thermal capacity, braking or frame strength, and can let the system draw more than the rest of the build supports. Upgrade whichever limit is actually binding.
What is ghost pedalling and can tuning fix it?
It is the disconnected feeling when assistance far exceeds your pedalling effort, so the pedals spin without contributing. Lowering assist at PAS 1 and 2 and softening the acceleration ramp usually restores a connected feel. It is a tuning problem, not a hardware fault.
Does tuning a controller down make a 2000W kit road-legal?
No. Classification follows the motor’s documented continuous rated power, not a software setting. A 2000W kit remains outside EAPC classification whatever limit is selected. If you need road-legal use, that means a 250W motor, not a restricted 2000W one.
How do I know if I have tuned too far?
Watch for voltage sagging heavily under load, motor or controller running unusually hot after sustained climbing, inconsistent behaviour, or repeated cut-outs. Any of those means step back down. Judge after several minutes of real load, because thermal limits do not show up in the first few seconds.
Sources
EDN — Field-oriented control by the numbers: motor and inverter efficiency trade-offs.
A note on safety & legality. General information, not a substitute for the manufacturer’s instructions or a qualified technician. Never set a current limit above what the battery can continuously supply or its BMS allows, never exceed a controller’s rated maximum, and never tune a bike whose brakes, axle hardware, torque restraint or wiring are not already sound. Test on private land with permission, at low speed first. Stop immediately and investigate if you find unusual heat, a burning smell, discoloured or melted insulation, or a swollen battery, and use only a charger authorised for your pack. A 2000W system is outside GB EAPC classification: it may be used on private land only with the landowner’s permission and subject to site rules, or on public roads only with the relevant motor-vehicle approval, registration, tax, insurance, licence and equipment.
About this guide. Author: KirbEbike Editorial. Technical review: KirbEbike conversion-support team. Last reviewed: 17 August 2026. Methodology: legality and battery safety cross-checked against GOV.UK and London Fire Brigade guidance, and control-method efficiency behaviour against published motor-control engineering sources, all cited inline. The three-limits chart is an illustrative example using the 35A FOC controller figure published for our own 2000W kit alongside a 60A-rated pack; it is not a recommendation of settings, and readers should use their own component figures. The resistive-loss chart is arithmetic from I²R with resistance held constant, not a measured temperature rise. This guide provides no method for bypassing road-legal limits. Controller specifications were read from each manufacturer’s published material on 17 August 2026 and are their claims; verify against the datasheet rather than a retail listing.
Stay in the know
Conversion guides, fitting advice and the deals worth knowing about. No spam.