Gravel bikes represent the ultimate versatile cycling platform—equally capable on pavement, dirt roads, and singletrack. Adding electric assistance transforms these already-capable machines into unstoppable adventure tools that extend range, flatten hills, and open entirely new riding possibilities.
However, converting a gravel bike to electric power requires understanding the unique characteristics, limitations, and opportunities these bikes present.Unlike mountain bikes built for extreme abuse or road bikes optimized purely for pavement, gravel bikes occupy a middle ground that demands thoughtful conversion planning.
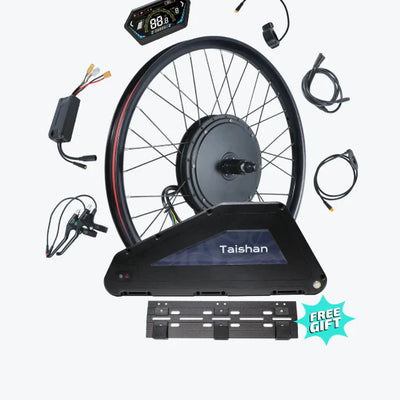
The right e-bike conversion kit amplifies your gravel bike's go-anywhere capability without compromising the lightweight efficiency and multi-surface handling that makes these bikes special. KirbEbike offers comprehensive conversion solutions specifically suited to gravel and adventure bike applications, from minimalist assist systems to powerful long-distance setups.
Understanding Gravel Bike Conversion Advantages
![]()

Why Gravel Bikes Excel as Conversion Candidates
Robust Frame Construction Gravel bikes feature reinforced frames designed for loaded touring and rough surfaces. Unlike lightweight road race bikes, gravel frames handle additional motor and battery weight without structural concerns.
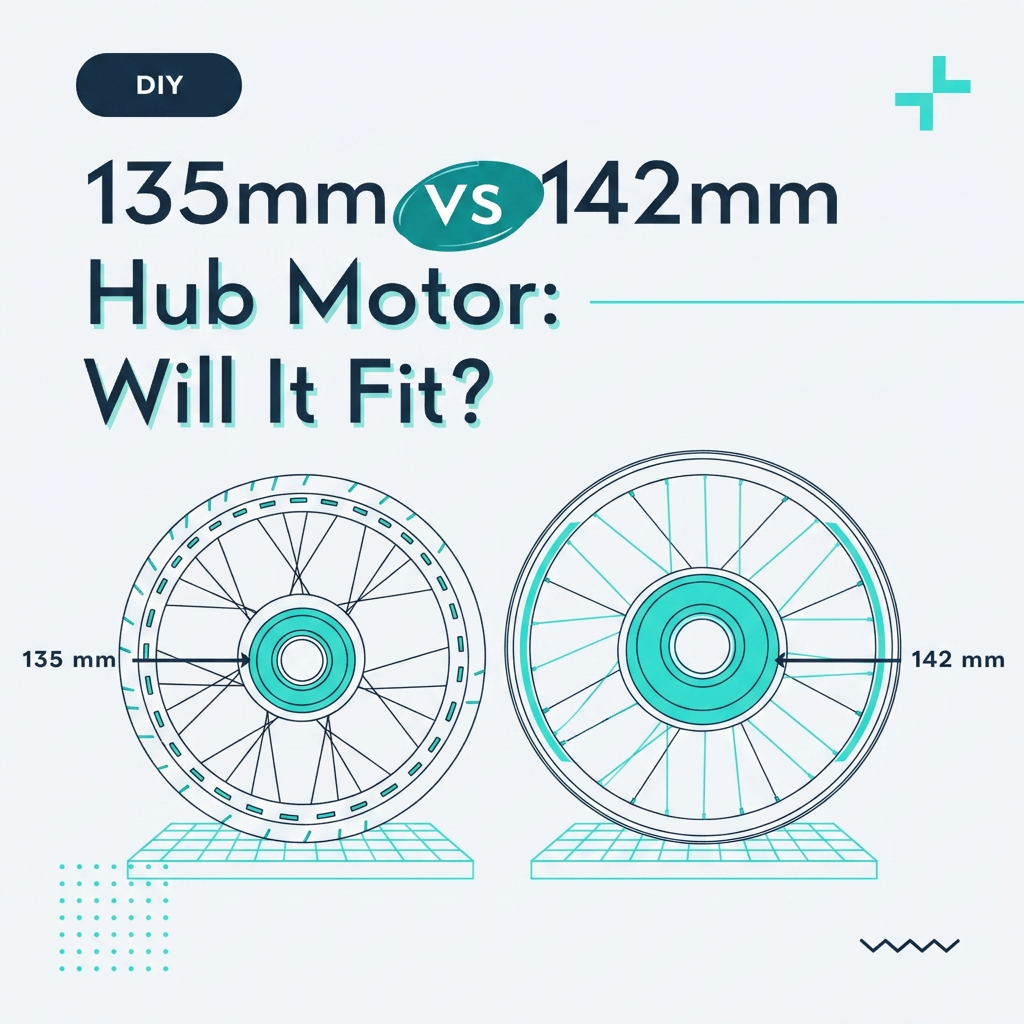
Generous Tire Clearance Wide tire clearance (typically 40-50mm) provides motor installation flexibility, particularly for hub motors that add width to the rear triangle.
Multiple Mounting Points Fender eyelets, rack bosses, and additional bottle cage mounts offer abundant battery and accessory mounting options unavailable on pure road bikes.
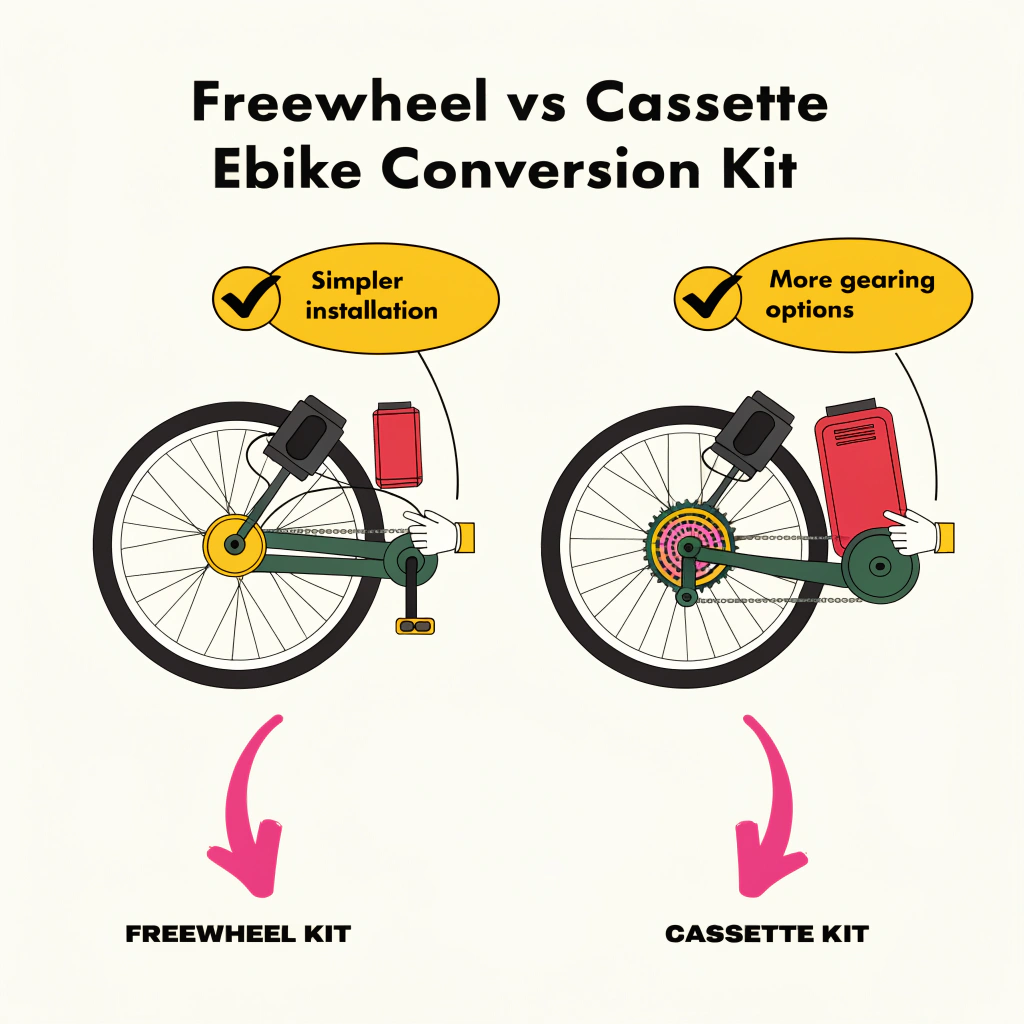
Versatile Gearing Gravel bikes typically run wide-range cassettes (11-42T or larger) that work brilliantly with both hub motors and mid-drive systems.
Disc Brake Standard Hydraulic disc brakes handle the increased speeds and weight of converted systems far better than rim brakes.
Gravel Riding Demands on Conversion Systems
Adventure cycling presents unique electrical system requirements:
-
Extended range needs for remote routes without charging access
-
Weather resistance for year-round all-conditions riding
-
Vibration tolerance from rough gravel and washboard surfaces
-
Climbing capability for steep unpaved ascents
-
Efficiency balance between power and battery conservation
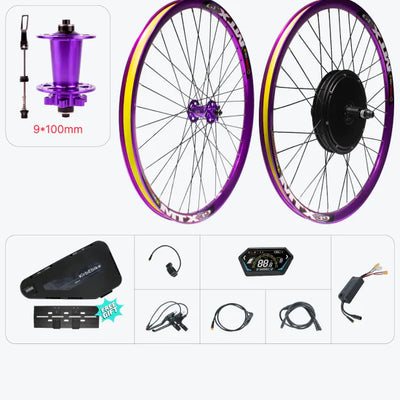
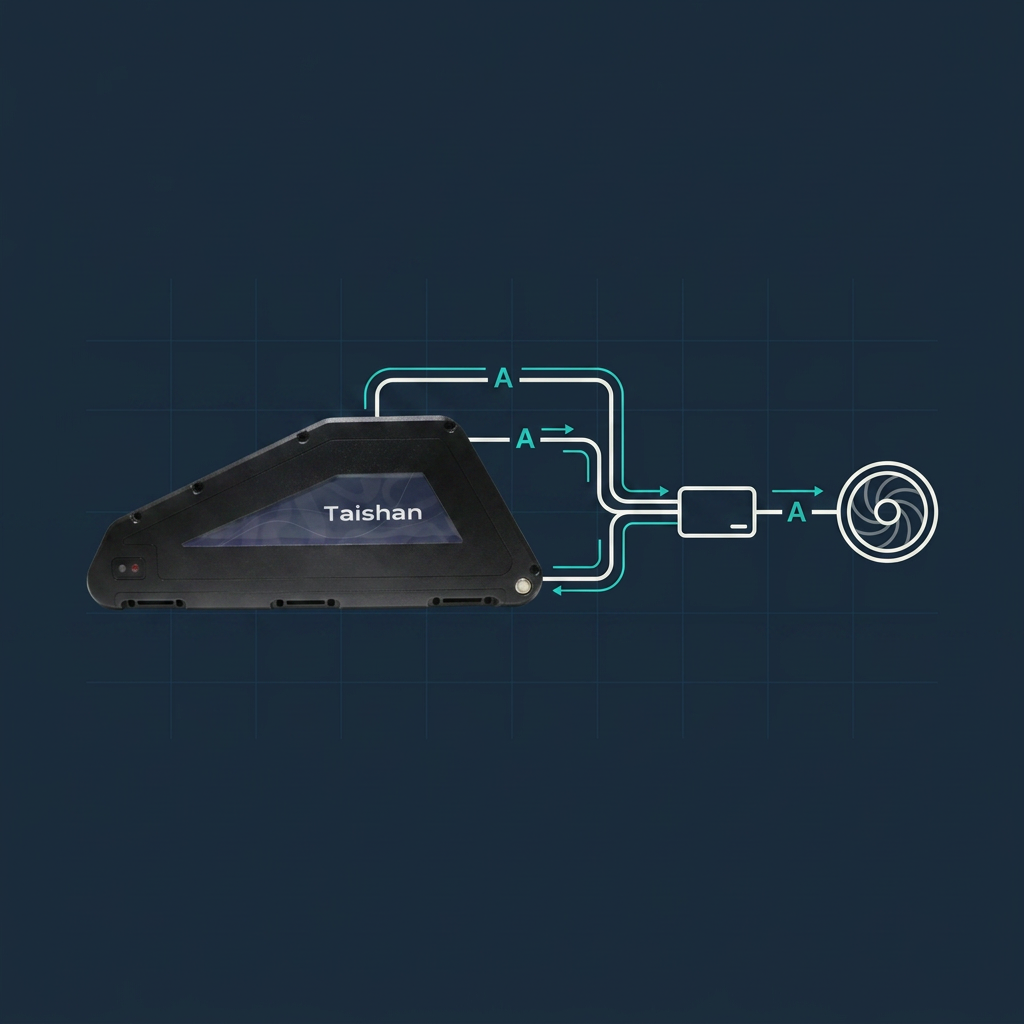
Motor Selection for Gravel Bike Applications
![]()

Hub Motor Systems: Simplicity Meets Adventure
Rear Hub Motors for Gravel Bikes
Rear wheel hub motors provide reliable, low-maintenance power ideal for long-distance gravel adventures.
Key advantages:
- Independent operation from drivetrain (no additional chain wear)
- Sealed construction resists dust and moisture
- Simple installation with minimal frame modifications
- Powerful options available (500-2000W)
- Silent operation preserves wilderness experience
Power recommendations by terrain:
|
Gravel Terrain Type
|
Recommended Power
|
Typical Speed
|
Best Battery
|
|
Flat gravel roads
|
500-750W
|
30-40km/h
|
48V 11-16Ah
|
|
Rolling hills
|
750-1000W
|
35-45km/h
|
48V 16-20Ah
|
|
Mountainous gravel
|
1000-1500W
|
40-50km/h
|
52V 20-25Ah
|
|
Bikepacking/loaded
|
1000-1500W
|
30-40km/h
|
52V 25-30Ah
|
Front Hub Motors: Limited Gravel Application
While front hub motors work for urban commuting, they prove less ideal for gravel riding due to traction limitations on loose surfaces and steep climbing disadvantages.
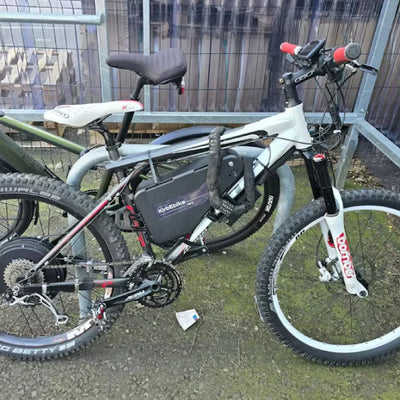
Mid-Drive Systems: The Gravel Enthusiast's Choice
Mid-drive conversion kits like the KirbEbike Tongsheng TSDZ8 offer significant advantages for serious gravel and adventure riding.
Why mid-drives suit gravel bikes:
Efficiency Through Gearing
- Leverage bike's entire gear range for optimal motor efficiency
- Maintain high cadence on varied terrain
- Reduce battery consumption through proper gear selection
- Superior climbing on steep unpaved ascents
Weight Distribution
- Central motor placement maintains ideal bike balance
- Unaffected handling through technical sections
- Easier bikepacking load management
- Natural riding feel preserved
Technical Terrain Capability
- Power delivery through cranks feels intuitive
- Torque sensors provide precise control on loose surfaces
- Maintains ground clearance (no low-hanging motor)
- Preserves quick-release wheel convenience
Mid-drive considerations for gravel:
The primary mid-drive tradeoff involves increased drivetrain wear. Gravel riding's constant power variation and frequent shifting accelerates chain and cassette wear beyond mountain biking levels. Budget for:
- Chain replacement every 1500-2500km
- Cassette replacement every 3000-5000km
- Chainring inspection every 2000km
- Higher-quality drivetrain components from the start
Power Level Selection Strategy
Conservative Approach (500-750W): Ideal for riders prioritizing range, natural riding feel, and regulatory compliance. Provides meaningful assistance without overwhelming the gravel bike experience.
Balanced Approach (750-1000W): Sweet spot for most gravel applications. Handles challenging climbs, headwinds, and loaded touring while maintaining reasonable efficiency.
Performance Approach (1000-1500W): Maximum capability for extreme terrain, heavy loads, or riders wanting car-replacement adventure capability. Requires careful component selection and robust frame.
Battery Integration for Adventure Cycling
![]()

Capacity Planning for Gravel Riding
Range calculation for gravel bikes differs significantly from road cycling due to variable surfaces, inconsistent speeds, and frequent elevation changes.
Real-world range factors:
Surface Quality Impact:
- Smooth gravel: 100% baseline efficiency
- Chunky gravel: 85% efficiency (increased rolling resistance)
- Sandy/loose surfaces: 70% efficiency (significant power loss)
- Mixed pavement/gravel: 90% efficiency
Terrain Elevation:
- Flat routes: 60-80km per 500Wh
- Rolling terrain (400m gain): 45-60km per 500Wh
- Mountainous (800m+ gain): 30-45km per 500Wh
Recommended capacities by ride length:
-
Day rides (50-80km): 500-750Wh (36V 13-15Ah or 48V 11-16Ah)
-
Long adventures (80-120km): 750-1000Wh (48V 16-20Ah or 52V 15-20Ah)
-
Multi-day bikepacking: 1000-1500Wh (52V 20-30Ah or dual battery system)
Browse KirbEbike's battery collection to find adventure-ready capacity options with robust construction for demanding gravel conditions.
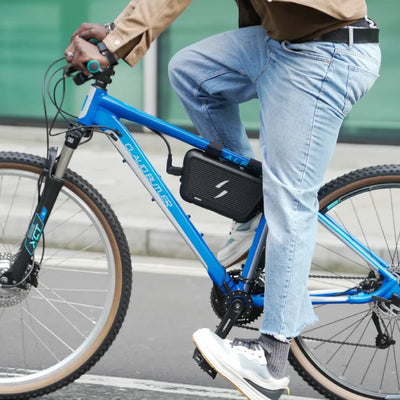
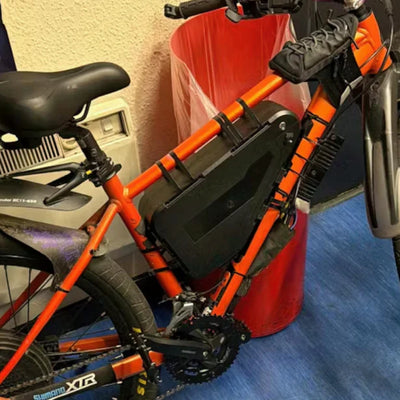
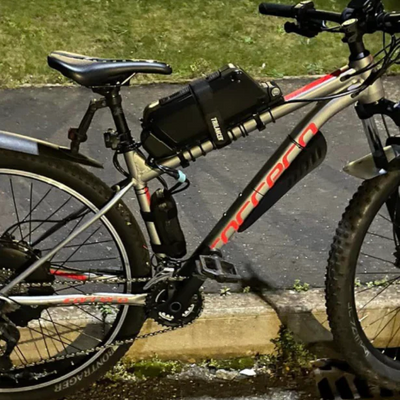
Battery Mounting Solutions for Gravel Bikes
Downtube Mounting: The Standard Approach
Most gravel bikes feature suitable downtube geometry for direct battery mounting.
Advantages:
- Low center of gravity maintains handling
- Protected position from trail debris
- Professional integrated appearance
- Easy removal for charging
Installation requirements:
- Water bottle cage bosses (or hose clamp mounting)
- Adequate clearance from crankset
- Sufficient tube diameter (45mm minimum)
- Consideration of additional bottle cage locations
Frame Bag Battery Solutions
Custom triangle bags offer exceptional versatility for gravel conversions, particularly on bikes with complex frame shapes or full bikepacking setups.
Benefits for adventure riders:
- Fits any frame geometry
- Weather protection from integrated bag
- Allows irregular battery shapes
- Can accommodate spare battery alongside primary
Considerations:
- Occupies traditional storage space
- May interfere with large frame bags
- Requires quality waterproof construction
- Weight centered but higher than downtube mount
Rear Rack Mounting: Bikepacking Option
For gravel bikes equipped with rear racks, rack-top battery mounting provides another avenue.
Best applications:
- Bikes already running rear racks for panniers
- Riders wanting to preserve frame space for gear
- Touring-oriented setups with substantial cargo capacity
- Secondary battery location for dual-battery systems
Limitations:
- Higher center of gravity affects handling
- Exposed to weather and trail spray
- Requires robust rack rated for battery weight
- Less ideal for technical terrain
Final Conversion Planning Checklist
Successfully converting your gravel bike requires systematic planning addressing these critical factors:
Motor Selection:
- Hub motor for simplicity and reliability
- Mid-drive for efficiency and climbing performance
- Power level matching your typical terrain
Battery Capacity:
- Calculate typical ride distances
- Factor elevation gain and surface conditions
- Consider dual battery for ultra-distance
Component Compatibility:
- Verify dropout spacing and axle standards
- Confirm brake adequacy for power level
- Assess drivetrain for mid-drive upgrade needs
Installation Approach:
- Downtube battery for standard installations
- Frame bag for complex geometries or bikepacking
- Professional assistance for internal routing challenges
Accessory Integration:
- Lighting powered from main system
- USB charging for devices
- Fender and rack compatibility maintained
The versatility that makes gravel bikes compelling extends beautifully to electric conversion. Unlike specialized road or mountain bikes with narrow use cases, electrified gravel bikes deliver genuine multi-surface capability that transforms how far and adventurously you can ride. Explore KirbEbike's complete conversion kit range to find the perfect electric assistance for your next gravel adventure—whether that's exploring new backroads an hour from home or embarking on multi-day bikepacking expeditions through remote terrain.
Frequently Asked Questions
What power level works best for gravel bike conversion with typical mixed-terrain riding?
For most gravel riders, 750-1000W provides the ideal balance. This power range handles steep unpaved climbs, headwinds, and loaded touring while maintaining reasonable battery efficiency. Consider 500-750W for primarily flat gravel roads or 1000-1500W for mountainous terrain with heavy bikepacking loads.
Should I choose hub motor or mid-drive for gravel bikepacking adventures?
Mid-drive systems generally suit bikepacking better due to superior efficiency under load and climbing capability through gear leverage. However, hub motors offer simplicity and low maintenance—crucial for remote adventures far from bike shops. Your mechanical confidence and terrain determine the best choice.
How much does gravel bike conversion affect handling on technical terrain?
Expect 5-10kg weight addition affecting handling noticeably but not drastically. Maintain low battery positioning (downtube or frame bag) to preserve center of gravity. Most riders adapt quickly and appreciate the added momentum through rough sections. Technical descending feels heavier but remains controllable with practice.
Can I still use bikepacking bags after conversion with frame-mounted battery?
Yes, with planning. Downtube batteries typically allow full-size frame bags, though capacity reduces slightly. Triangle frame bags need careful sizing around batteries. Handlebar bags, seat bags, and top tube bags work normally. Some riders use rack-top batteries specifically to preserve full frame bag space.
What realistic range can I expect from a 750Wh battery on gravel terrain?
Highly variable with terrain and assist level, but expect 60-90km on rolling gravel at moderate assist. Flat smooth gravel may deliver 100km+, while mountainous routes with aggressive power usage drop to 40-50km. Carrying a spare battery or planning mid-ride charging extends adventure possibilities dramatically.
Will conversion void my gravel bike frame warranty?
Almost certainly yes. Manufacturers typically void warranties when motors are added, particularly for carbon frames. This matters less for older bikes past warranty periods or budget aluminum frames. Consider warranty implications before converting new or expensive frames—or accept the risk as part of the conversion decision.
How do I protect electrical components from gravel riding's mud and water exposure?
Choose kits with IP65 or IP66 waterproof ratings. Protect all connections with dielectric grease and heat shrink. Route cables away from direct wheel spray. Use frame bags to shield batteries from elements. Clean and inspect electrical connections regularly, particularly after muddy or wet rides. Avoid pressure washing near electrical components.
: invalid url input)
usmile
Liquid error (snippets/blog-best-product line 36): product form must be given a product
Liquid error (snippets/blog-best-product line 59): product form must be given a product