For many cyclists, punctures are simply part of the experience; however, understanding how to approach one can be a lifesaver. From finding a slow puncture and creating a puncture repair kit to changing an inner tube, this guide has everything needed.
Whether you are a professional rider or just started biking, these tips are useful for any tire repair work. Knowing that you can safeguard your ride from worrying bumps with the right tools and information is important.
What are Punctures?
A puncture refers to a small hole in the tire, which, when pressed, leads to the total deflation of the inner tube. Most of the time, they can be annoying and troublesome, especially when one gets a flat tire while cycling in a different area. Therefore, It is important to understand how best to handle a puncture repair as soon as possible.
It also makes it possible to be on the road without much trouble. Also, knowing how to repair puncture allows one to spend less cash and not have to take the bicycle to the shop so often. Therefore, every cyclist should know how to handle situations when the tire has a puncture.
How Long Does A Slow Puncture Take To Go Down?
A slow puncture can be such an inconvenience to bike riders and cyclists in general. How long it will take for the slow puncture to go down depends on the puncture's size and the tire's condition. If the puncture is very small, it may only be several days or a week or two before one notices the considerably low tire pressure.
But with bigger holes, the tyre would deflate much sooner, which could be done within hours. Punctures that gradually occur can be identified early if the tyre pressure is checked often. It is essential to note that high-quality tires from Kirbebike will go a long way in minimising the instances of slow punctures.
How To Fix A Puncture?
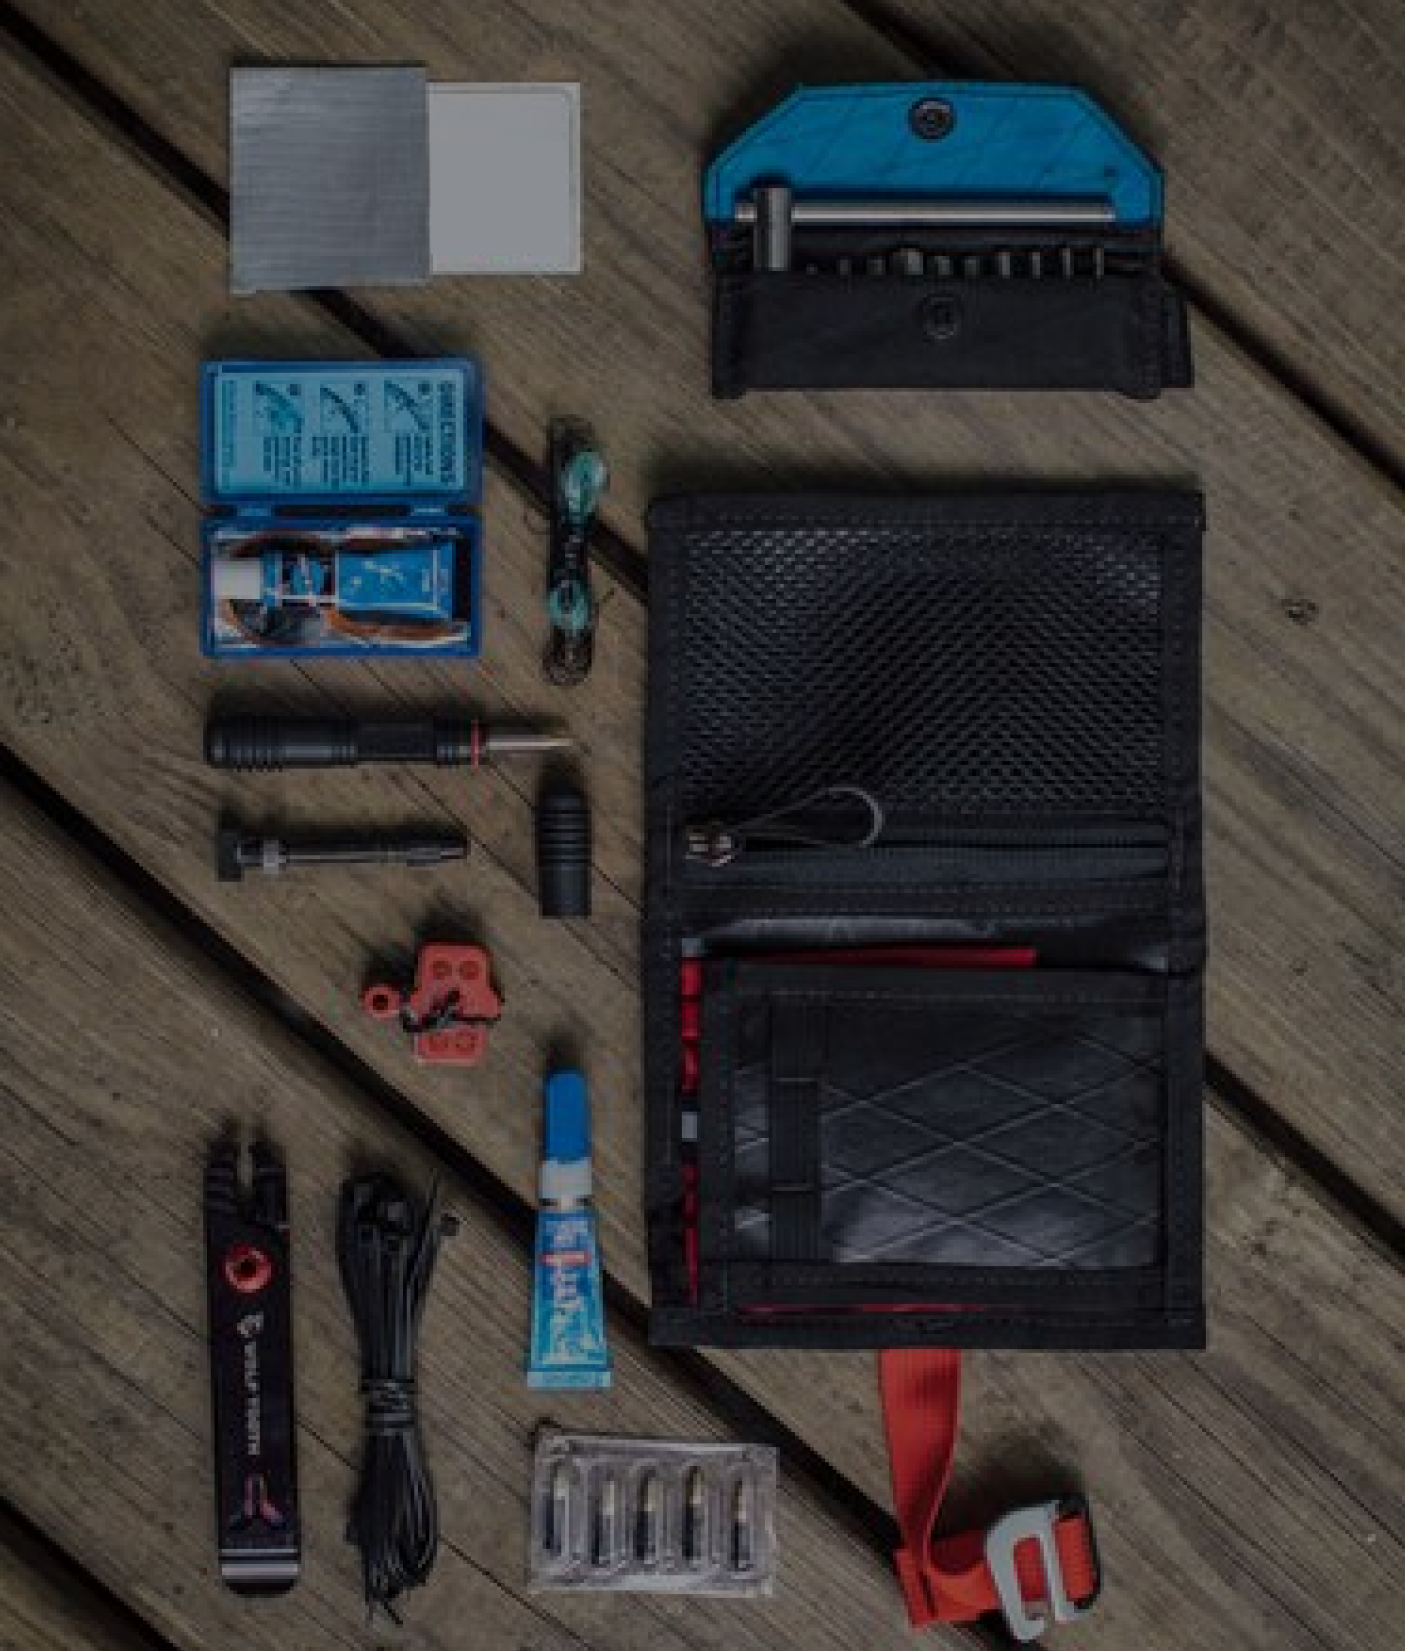
Fixing a puncture is straightforward. First, locate the puncture by inflating the tire and listening for escaping air or submerging the tire in water to see bubbles. Once found, mark the spot. Remove the tyre and take out the internal tube. Dry the area around the puncture thoroughly. Use a puncture repair kit from Kirbebike to apply a patch over the puncture. Press it firmly and let it set for a few minutes. Reassemble the tire and inflate it. This method ensures a reliable tire puncture repair.
How To Use A Puncture Repair Kit?
Using a puncture repair kit is important knowledge for any bike owner. Here are the steps:
-
Locate the Puncture:Firmly inflate the tire and find the puncture.
-
Prepare the Area: Roughen the place across the puncture, using the sandpaper from the kit.
-
Apply Glue: Spread a thin layer of glue across the puncture site.
-
Patch It Up: Place the patch over the glue and press it firmly.
-
Let It Set: Allow a few minutes for the glue to dry.
-
Reassemble: Put the inner tube back into the tire and inflate.
Using the best puncture repair kit can make this process easier and more effective.
How Much Is A Puncture Repair?
The price of repairing a puncture is based on whether you want it to a shop or do it yourself. A bike puncture repair package from different can cost anywhere from $ 5 to $ 20.
If you pick to have an expert repair it, the value should vary from $10 to $30, depending on the bike shop's prices. Investing in a very good puncture repair kit can ultimately save cash, as it permits for more than one repair.
How To Change An Inner Tube?
Changing an inner tube is so simple and easy that any cyclist should be able to perform. This is how you do it:
-
Remove the Wheel: Take the bike's wheel off first.
-
Deflate the Tyre: Take all the air out of the tire.
-
Remove the Tyre: Remove the tire with the help of tire levers.
-
Take Out the Inner Tube: Carefully remove the damaged inner tube.
-
Check the Tyre: Check for any sharp objects inside the tire.
-
Insert a New Tube: Blow slightly on the tube and then fit it in the tire.
-
Reassemble the Tyre: Place the tire onto the rim.
-
Inflate: Ensure the tire is inflated to the standard pressure.
What Inner Tube Do I Need?
Choosing a proper inner tube to ensure problem-free biking is very important. The tire's scale, which features numerals or digits like "700×25" or "26×1" on the side, indicates the tire's width and diameter. This scale determines the inner tube size.
Identify these numbers with the inner tube packaging. Additionally, consider the type of valve: A Presta or a Schrader. However, it is recommended and essential that the inner tube corresponds to your tire size for optimal use.
Extra Tips for Preventing Punctures
Prevention is better than cure. Here are some guidelines to help save you punctures:
-
Check Tyre Pressure: Always match your tire pressure to your vehicle's recommended pressure. Tires with low pressure are likely to be easily punctured.
-
Regular Inspections: Occasionally inspect the tires for sharp objects such as glass or stones stuck in between.
-
Use Tire Liners: These strips fit between your tire and inner tube, providing extra protection.
-
Upgrade Your tyres: Puncture-proof wheels from Kirbebike are good enough to avoid puncture by investing in them fully.
Conclusion
Every cyclist must understand puncture repair. It is beneficial to remain knowledgeable about puncture repair kits and methods of changing an inner tube. Whether one has a slow puncture or a quick fix tyre, it can only mean that you must be prepared for any tire repair as a driver. If you want to buy bikes for any purpose, consider visiting Kirbebike. Their products, such as bike puncture repair kits, guarantee that you have the right equipment to get the job done.
Kirbebike's mission is to deliver value to cyclists and supply them with the best equipment and information. Visit Kirbebike today and explore their range of high-quality kits and other biking accessories. Their products ensure you have the right equipment to keep your rides smooth and enjoyable.
Keep your rides worry-free with Kirbebike!
: invalid url input)
usmile
Liquid error (snippets/blog-best-product line 36): product form must be given a product
Liquid error (snippets/blog-best-product line 59): product form must be given a product