High-power e-bike conversion kits transform ordinary bicycles into thrilling electric machines capable of impressive speeds and performance. However, with power ratings ranging from 1500W to 4000W, these high power ebike conversion kits demand rigorous safety protocols before every ride.
Unlike lower-powered systems, high-wattage kits generate substantial forces that stress every component of your bicycle, making pre-ride inspections not just recommended—but essential for your safety.
Understanding High-Power System Risks
![]()

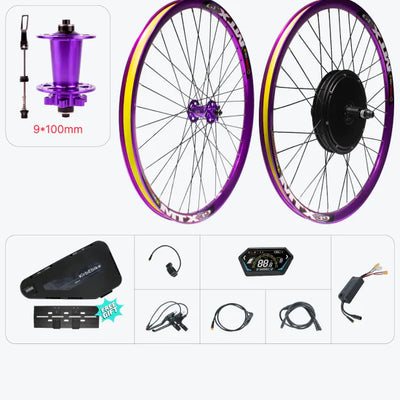
Before diving into the checklist, understanding why high-power systems require extra attention helps motivate thorough inspections.
Forces Generated by High-Power Motors
Performance Specifications:
- 1500W-2000W systems: 50-60 km/h top speeds, rapid acceleration
- 2500W-3000W systems: 75-85 km/h capabilities, extreme torque delivery
- 4000W systems: 85+ km/h potential, motorcycle-level forces
These performance levels create mechanical stresses far exceeding what standard bicycle components were designed to handle. A 52V 2000W motor can accelerate a bike from standstill to 40 km/h in under 5 seconds—forces that test wheel integrity, brake capacity, and frame strength.
Common High-Power Failure Points
High-power conversions typically experience issues in these areas:
- Spoke tension failures from torque and acceleration forces
- Brake system inadequacy for increased speeds and weight
- Electrical connection loosening from vibration
- Battery mounting security under acceleration loads
- Frame stress at motor mounting points
Pre-Ride Visual Inspection Protocol
Every ride should begin with a systematic visual inspection covering critical safety components. This five-minute routine prevents most mechanical failures.
Frame and Motor Mounting Check
What to Inspect:
- Motor mounting bolts: Check for any loosening (particularly important for mid-drive systems)
- Frame integrity: Look for cracks, especially near motor mounting points
- Torque arm security: Ensure torque arms remain firmly attached with no movement
- Dropout alignment: Verify axle sits squarely in frame dropouts
Red Flags:
- Any visible cracks in frame or welds
- Loose motor mounting hardware
- Axle movement within dropouts
- Paint cracking around stress points
For mid-motor conversion kits, pay particular attention to bottom bracket shell integrity. The Tongsheng TSDZ8 system delivers 140Nm of torque directly through this area—any looseness indicates immediate attention needed.
Wheel and Spoke Inspection
High-power hub motors place enormous stress on wheel structures. Spoke failures represent one of the most common high-power e-bike issues.
Inspection Steps:
- Visual Spoke Check:
- Look for bent, broken, or obviously loose spokes
- Check spoke crossings for wear marks
- Inspect spoke nipples for cracks
- Tension Test:
- Squeeze parallel spoke pairs—they should feel uniformly tight
- Pluck spokes like guitar strings—listen for consistent tone
- Any dramatically different tensions indicate wheel needs truing
- Rim Condition:
- Examine rim sidewalls for cracks or deformation
- Check for brake track wear (if using rim brakes)
- Verify rim tape covers all spoke holes properly
Spoke Tension Standards:
|
Motor Power
|
Recommended Spoke Gauge
|
Minimum Spoke Count
|
Inspection Frequency
|
|
1500W-2000W
|
12-13 gauge (2.3-2.6mm)
|
36 spokes
|
Weekly
|
|
2500W-3000W
|
12 gauge (2.6mm)
|
36-48 spokes
|
Every 3 rides
|
|
4000W
|
11-12 gauge (2.6-3.0mm)
|
48+ spokes
|
Before each ride
|
Brake System Verification
Braking becomes exponentially more critical at higher speeds. Your brakes must handle not just increased speed but also the additional weight of battery and motor systems.
Brake Component Checklist:
Disc Brakes (Recommended for High-Power):
- Rotor condition: Check for warping, cracks, or excessive wear
- Pad thickness: Minimum 1.5mm material remaining
- Caliper mounting: Ensure mounting bolts are torqued properly
- Hydraulic lines: Inspect for leaks, kinks, or damage
- Lever feel: Should be firm with no sponginess
Brake Performance Standards:
|
System Power
|
Minimum Rotor Size
|
Brake Type Required
|
Pad Material
|
|
1500W-2000W
|
180mm
|
Hydraulic disc
|
Semi-metallic
|
|
2500W-3000W
|
180-203mm
|
Hydraulic disc
|
Sintered metal
|
|
4000W
|
203mm+
|
Hydraulic disc
|
Sintered metal
|
Quick Brake Test: Before riding, perform a stationary brake test. With the bike stationary, apply brakes firmly—wheels should lock immediately without excessive lever travel. Any hesitation or soft feel requires immediate attention.
Electrical System Safety Inspection
![]()

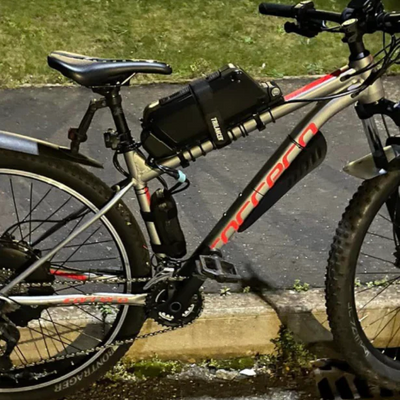
High-power systems push electrical components to their limits. Proper electrical inspection prevents dangerous failures and potential fires.
Battery Connection and Mounting
Critical Battery Checks:
- Battery lock engagement: Ensure battery locks completely, no play
- Mounting security: Battery shouldn't move when shaken vigorously
- Connection cleanliness: Inspect main connector for corrosion or damage
- Ventilation: Check battery vents aren't blocked by debris
- Physical damage: Look for dents, swelling, or case damage
Warning Signs:
- Battery case swelling (stop using immediately)
- Unusual heat after riding
- Burning smell near battery
- Liquid leakage
- Cracked case or visible damage
Wiring and Connector Inspection
Vibration and weather exposure gradually degrade electrical connections. Regular inspection catches problems before they cause failures.
Connection Points to Check:
- Motor phase wires to controller
- Battery discharge connector
- Display and control connections
- Throttle and brake sensor wiring
- Speed sensor cables
Inspection Procedure:
- Visually inspect each connector for corrosion or damage
- Gently tug each connection—should be secure with no movement
- Check cable routing—no sharp bends or chafe points
- Verify cable ties and mounts hold wiring securely
- Look for any exposed or damaged insulation
Controller and Display Function Test
Power-On Verification:
- Display illuminates with correct voltage reading
- Battery indicator shows appropriate charge level
- No error codes displayed
- All control inputs respond (throttle, pedal assist, mode changes)
Voltage Checks:
|
Battery Voltage
|
Fully Charged
|
50% Charge
|
Critical Low
|
|
48V System
|
54.6V
|
48V
|
42V
|
|
52V System
|
58.8V
|
52V
|
45.5V
|
|
60V System
|
67.2V
|
60V
|
52V
|
|
72V System
|
84V
|
72V
|
63V
|
Never ride with battery voltage below critical low threshold—this risks battery damage and sudden power loss.
Tire Pressure and Condition Assessment
![]()

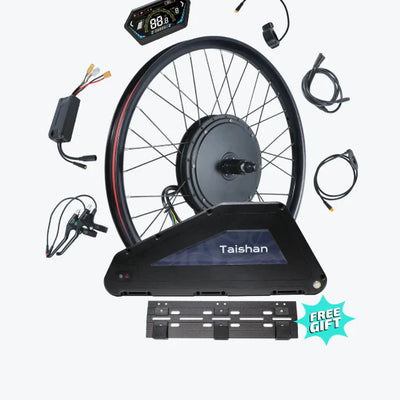
High-power e-bikes demand proper tire maintenance for safety and performance.
Pressure Requirements
Recommended Pressures by Application:
- Road/commuting: 50-65 PSI (higher pressures for speed efficiency)
- Mixed terrain: 40-50 PSI (balance between comfort and speed)
- Off-road/trail: 25-35 PSI (lower for traction and shock absorption)
- Fat tire bikes: 15-25 PSI (designed for lower pressures)
Pressure Check Method: Use a quality digital pressure gauge—analog gauges often become inaccurate. Check pressure when tires are cold (before riding), as pressure increases 10-15% during use.
Tire Wear and Damage Inspection
Visual Inspection Points:
- Tread depth: Sufficient for conditions (grooves visible)
- Sidewall integrity: No cracks, bulges, or cuts
- Embedded debris: Remove glass, thorns, or metal
- Valve condition: Valve core tight, no leaking
Replacement Indicators:
- Tread worn to wear indicators
- Sidewall cracking or dry rot
- Bulges indicating internal damage
- Frequent punctures suggesting worn protection layer
High-power acceleration and speeds accelerate tire wear significantly. Budget for tire replacement every 2000-4000 km depending on power level and riding style.
Environmental and Route Assessment
High-power e-bikes require different route planning than standard bicycles.
Pre-Ride Route Evaluation
Safety Considerations:
-
Legal Restrictions: Verify your route allows e-bike use (some paths/trails prohibit electric bikes)
-
Surface Conditions: Wet, loose, or damaged surfaces become dangerous at high speeds
-
Traffic Patterns: High-power speeds place you in traffic flow rather than bike lane speeds
-
Emergency Services: Consider proximity to help if mechanical issues occur
Weather Condition Impact
Weather-Specific Precautions:
Rain/Wet Conditions:
- Reduce speed by 30-40% (braking distances increase dramatically)
- Increase following distances
- Avoid puddles (electrical component risk)
- Check brake function before descents
Cold Weather (Below 10°C):
- Battery capacity reduced 15-25%
- Plan for reduced range
- Allow battery to warm before riding if stored cold
- Check tire pressure (drops in cold)
Hot Weather (Above 30°C):
- Monitor battery temperature
- Reduce sustained high-power use
- Ensure adequate ventilation around battery
- Take breaks on long climbs to prevent overheating
Emergency Equipment Checklist
High-power e-bikes venture further from home, making emergency preparedness essential.
Mandatory Carry Items
Basic Emergency Kit:
- Mobile phone (fully charged)
- Multi-tool with hex keys, screwdrivers
- Spare tube or tire repair kit
- Portable pump or CO2 inflator
- Zip ties and duct tape
- Basic first aid supplies
High-Power Specific Items:
- Spare electrical connectors
- Electrical tape
- Torque wrench (for critical bolt checks)
- Emergency contact information
- Basic battery testing equipment
Breakdown Protocol
If Mechanical Failure Occurs:
- Move safely off roadway immediately
- Assess situation—can it be field-repaired?
- Disconnect battery if electrical issue suspected
- Contact support or arrange transport (high-power e-bikes too heavy for easy pushing)
- Document issue for later repair reference
Maintenance Record Keeping
Systematic record-keeping identifies problems before they become dangerous.
Essential Maintenance Log
Track these items in a simple notebook or app:
Per-Ride Records:
- Date and distance
- Weather conditions
- Any unusual sounds or behaviors
- Components inspected
Maintenance Triggers:
|
Component
|
Inspection Interval
|
Replacement Interval
|
|
Brake Pads
|
Every 3 rides
|
500-1000 km
|
|
Chain
|
Weekly
|
1000-2000 km
|
|
Tires
|
Every ride
|
2000-4000 km
|
|
Spokes
|
Weekly
|
As needed
|
|
Battery Health
|
Monthly
|
After 1000 cycles
|
Conclusion
Operating a high power ebike kit safely requires commitment to thorough pre-ride inspections and ongoing maintenance. While these checklists may seem extensive, they become quick routine once established.
The five minutes spent on pre-ride inspection prevents hours of repair work and potentially serious injuries. High-power conversion kits deliver exhilarating performance, but that performance comes with responsibility.
By following these safety protocols religiously, you ensure every ride on your converted e-bike remains both thrilling and safe. Remember: the faster and more powerful your system, the more critical safety inspections become—never skip these essential steps.
Frequently Asked Questions
How often should I check spoke tension on a high-power e-bike?
For systems above 2000W, check spoke tension before every ride during the first month, then weekly once the wheel stabilizes. High-power motors stress spokes significantly, and loose spokes can cascade into complete wheel failure rapidly.
What's the most critical safety check before riding a 3000W+ conversion?
Brake system verification is paramount. At speeds exceeding 70 km/h, brake failure becomes catastrophic. Always test brake response stationary and at low speed before committing to high-speed riding.
Can I skip pre-ride inspections on short trips?
Never skip inspections regardless of trip length. Mechanical failures occur randomly, and even a 5-minute ride at high speeds can result in serious injury if critical components fail. Consistent inspection routines catch problems early.
How do I know if my frame can handle high-power conversion safely?
Quality mountain bike frames with aluminum or steel construction typically handle up to 2000W safely. Above 2500W, look for frames specifically designed for e-bike conversion or motorcycles. If uncertain, consult a professional frame inspector before installing high-power systems.
What should I do if I notice battery swelling?
Stop using the battery immediately—swelling indicates dangerous internal failure. Store the swollen battery outdoors away from flammable materials, and arrange professional disposal. Never attempt to use, charge, or transport a swollen lithium battery.
Are torque arms necessary for all high-power conversions?
Yes, torque arms are essential for any system above 750W. High-power motors generate forces that can pull dropouts out of frame alignment or cause catastrophic frame failure. Always install manufacturer-recommended torque arms and check their tightness regularly.
How can I tell if my brakes are adequate for high-power e-bike speeds?
Test stopping distance at controlled speeds. At 40 km/h, you should stop within 10-12 meters with firm braking. If stopping distances exceed this or brakes feel inadequate, upgrade to larger rotors, better calipers, or both before riding at high speeds.
: invalid url input)
usmile
Liquid error (snippets/blog-best-product line 36): product form must be given a product
Liquid error (snippets/blog-best-product line 59): product form must be given a product